VaccineWeb
시나리오: COVID-19 치료제로 사용될 후보 백신 정보를 정리한 페이지 파일 내용 확인이 불가능한 상태다.
홈페이지에서 단서를 찾고 백신 정보를 찾아내자!

Scenario: It is impossible to check the contents of the page file containing information on candidate vaccines to be used as a treatment for COVID-19.
Find clues on the website and identify the vaccine information!
[그림 1] - VaccineWeb Main Page (secretdata.php)
시나리오는 COVID-19 치료제로 사용될 후보 백신 정보를 정리한 페이지 파일 내용 확인이 불가능하다고 한다. 홈페이지에서 단서를 찾고 백신 정보를 찾아내자고 적혀 있는데 파일 내용을 확인할 수 있어야 한다는 것을 알 수 있다.
이 점을 기억하고 추가적인 정보를 수집하자.
정보 수집
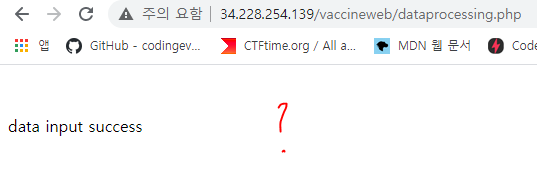
[그림 2] - data input
[그림 1]에 있던 DATA INPUT 입력 폼에 임의 값 1234를 넣고 DATA INPUT 버튼을 누르면 [그림 2]와 같이 dataprocessing.php 페이지로 이동되고 data input success라는 문자열이 출력된다. 다른 값을 넣더라도 [그림 2]와 동일한 장면이 나오는 것을 확인할 수 있다.
[그림 3] - fake flag
[그림 1] 메인 페이지에서 밑으로 조금 내려가면 [그림 3]이 보이는데 flag is c0v1d_c1e4r 라고 되어 있고 오른쪽에는 you find! :)라고 되어있다. 해당 내용은 진짜 flag가 아니다.
[그림 4] - Prevention (prevention.php)
prevention 탭을 누르면 prevention.php로 이동된다. 해당 탭 안에서는 시나리오에서 제시한 파일 내용 확인 관련 단서는 없는 것을 확인할 수 있다.
[그림 5] - Login (secretaccount.php)
Login 탭을 누르자 로그인 페이지가 나왔고 로그인 관련 사항으로 "Are you confident in logging in?" 로그인에 자신있냐는 질문과 로그인에 실패시 바이러스라는 문자열이 포함되어 있다.
그 아래에 ID와 Password 입력 폼과 LOGIN ACCESS, LOGIN PROCESSING SOURCE CODE 버튼이 있다.
[그림 6] - 로그인 임의 값 입력
1234, 1234로 로그인을 시도하자.
[그림 7] - alert 'virus' (login.php)
LOGIN ACCESS 버튼을 클릭하면 login.php 페이지로 이동하고 alert 메시지 박스에 올바르지 않은 값이므로 바이러스 페이지로 이동한다는 내용이 출력된다.
[그림 8] - virus.php
virus.php 페이지로 이동되고 다른 영향은 없고 페이지만 바뀐 것을 확인할 수 있다.
[그림 9] - LOGIN PROCESSING SOURCE CODE
다시 Login 페이지(secretaccount.php)로 돌아와서 로그인 과정을 확인하기 위해 LOGIN PROCESSING SOURCE CODE 버튼을 클릭하면 [그림 9]와 같이 백신 이미지가 있던 부분이 소스 코드 이미지로 변경되어 출력된다.
여기까지 정보 수집 결과로는 메인 페이지(secretdata.php)에 있던 data input 폼과 회원가입이 없이 로그인만 해야 하는 로그인 페이지(secretaccount.php) 이 두 부분이 해당 문제의 핵심이자 단서라고 볼 수 있다. 로그인을 해야 하는 것과 data input 폼에는 올바른 값을 넣어야 하는 것으로 보면 된다.
5. if 문에서 preg_match를 통해 medic1ne이 $id 변수에 있을 경우 virus 페이지로 이동시킨다.
6. 두 번째 if문에서 medic1ne이 있는지 검사하는데 대소문자를 구분하지 않는다. 그리고 $pw와 $pwcheck 변수 값이 같은지 검사하고 있다. 여기 값이 true가 되면 flag 값을 확인할 수 있고 false인 경우 else문이 실행되어 [그림 7]에서 본 메시지 박스 출력과 함께 virus page로 이동하게 된다.
여기서 취약한 부분을 아래의 표와 같이 정리했다.
함수
이유
extract()
변수 선언 전에 사용해야 하는데 선언 후에 했기 때문에 전에 변수 값을 클라이언트 측에서 마음대로 변경이 가능하다. 즉, GET 방식이므로 login.php?id=medic1ne으로 새롭게 지정이 가능하다.
preg_match()
preg_match에서 /medic1ne/는 대소문자 구분 없이 패턴을 찾는게 아니라 구분을 한다. 즉, /medic1ne/i로 해야 MEDIC1NE, Medic1ne 이렇게 대소문자가 섞여 있는 것도 찾을 수 있다. 하지만 위와 같이 구분을 하기 때문에 meDic1ne 이렇게 대문자 하나를 포함시켜주면 우회할 수 있다.
stristr()
위 분석 6번에서 언급한 것과 같이 대소문자를 구분하지 않는 strstr() 함수로 볼 수 있다. medic1ne을 $id 값과 비교하는데 대소문자를 구분하지 않는다. 즉, meDic1ne을 입력하면 우회할 수 있다.
preg_match와 stristr 둘 다 우회해야 하기 때문에 medic1ne을 그대로 입력하면 preg_match에 걸리는 대신 stristr은 우회된다. 하지만 virus.page로 이동된다. 그래서 둘 다 우회할 수 있는 meDic1ne 또는 MeDic1ne 등 대소문자를 섞거나 대문자로 넣어야 한다.
strcmp()
strcmp 함수의 경우 비교할 시 ===로 엄격하게 하는 것이 아닌 ==로 하게 되면 배열로 입력을 변경시키면 True가 된다.
정리하면 login.php?id=meDic1ne&pass[]= 이렇게 입력하면 stage1 코드 전부 우회하여 success로 접근할 수 있다.
[그림 10] - login success
위 입력 값 그대로 적용하면 success 문구와 함께 첫 번째 flag 값을 알려준다.
[그림 11] - second_flag (base64)
이후 확인을 누르면 [그림 11]과 같이 두 번째 flag 값이라고 출력되는데 base64로 보이는 코드가 나온다.
decode 사이트 또는 python 등을 이용하여 base64 디코딩을 진행하면
"Find and see vaccine.php" 라는 문자열로 변환된다.
vaccine.php 를 찾고 시나리오에 맞춰서 해당 파일 내용을 확인해야 한다는 의미다.
당연히 vaccine.php로 그냥 접근하면 아무것도 확인할 수 없다.
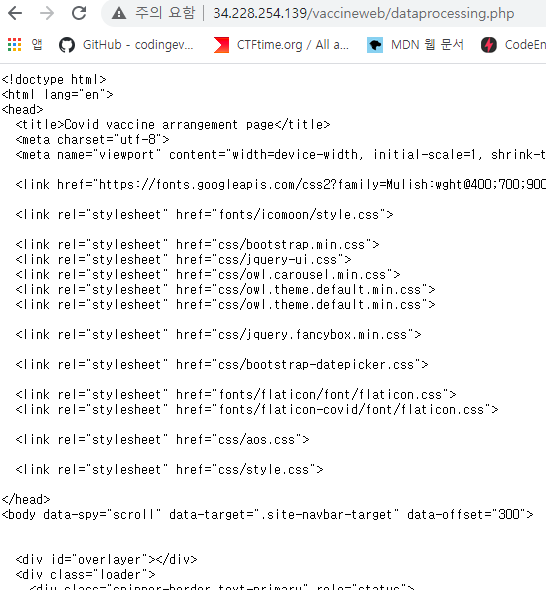
[그림 12] - stage2 (dataprocessing.php source code)
두 번째 플래그 메시지 박스 확인을 누르면 [그림 12]와 같이 새로운 소스 코드를 제공하는데 출력하는 echo 문자열들을 보면 [그림 2]에서 DATA INPUT 폼에 입력 후 이동되어 출력된 문자열과 같다는 것을 알 수 있다. "data input success"가 해당 문자열이다. [그림 12] 소스 코드를 분석하여 vaccine.php를 확인해야 한다.
코드 분석 및 풀이 stage2
<?php
    class medicine {
        public function __wakeup() {
            return highlight_file($this->input);
        }
    }

    class printstr {
        public function __wakeup() {
            return 'your input value: ' . $this->input;
        }
    }

    if(isset($_POST['input'])) {
        $data = ~~~~~~~~~~~~ $_POST['input']);

        unserialize($data);
        echo "<br><br> data input success";
    }

    else {
        echo("<script> location.href = 'virus.php'; </script>");
    }

?>
medicine이라는 클래스를 주목하자.
highlight_file($this->input)이 되어있는데 이 부분은 php코드를 그대로 노출 시켜주는 코드이다.
즉, 우리가 찾는 vaccine.php 내용을 노출 시켜서 확인할 수 있다는 것이다.
그리고 [그림 12]를 보면 '메인 페이지 이동' 이라고 친절하게 표시가 되어있다. 이 말은 메인 페이지에서 봤던 [그림 1]에서 접근한 DATA INPUT 폼 양식을 이용하라는 것이다. 해당 폼에 placeholder 값으로도 input vaccine data라고 되어있다.
highlight_file을 다루는 메서드와 your input value를 출력하는 메서드는 동일한 메서드로 __wakeup 메서드다.
이 메서드는 PHP 매직 함수, PHP 매직 메서드라고 불리는데 직렬화 또는 역직렬화에 반응하여 실행되는 특징을 가지고 있다. 바로 밑에 unserialize($data); 를 보면 역직렬화를 진행하고 있는 것을 볼 수 있다.
$data는 우리가 입력하려는 input 값을 POST 방식으로 받아서 $data 변수에 담고 해당 변수를 역직렬화를 수행하는 것이다. [그림 12]를 보면 이상한 점이 POST 앞 부분을 검정색 네모 박스로 조금 가려져 있는 것을 볼 수 있다. 무슨 이유일까? 하지만 오른쪽에 코드를 보면 ' ) ' 로 포함되어 있는 것으로 볼 때 다른 함수에 포함된 것으로 추측할 수 있다.
결론을 말하자면 검정색 가린 부분은 의미가 없다. why? 위 stage2는 PHP Object Injection 취약점이기 때문이다.
역직렬화를 입력 받는 부분에 Object Injection을 통해 원하는 값을 출력시킬 수 있다.
└▶ unserialize() 함수가 실행되면 __wakeup() 메서드 자동 실행
그렇기 때문에 제공한 소스 코드 dataprocessing.php 파일 내용도 직접 확인할 수 있고 vaccine.php, secretdata.php 등 어느 php 파일이던 다 확인할 수 있기 때문에 직접 가린 부분도 확인할 수 있다.
정리하면 다음과 같다.
1. PHP Object Injection 시도를 하다 보면 검정색 가린 부분이 어떤 함수인지 추측할 수 있다.
2. 확실하게 하고 싶으면 dataprocessing.php 를 Object Injection을 통해 확인하여 어떤 함수가 포함되어 있는 건지 확인 후 vaccine.php 파일을 확인하면 된다.
자 그럼 PHP Object Injection을 수행하여 해결하자.
~~~~~~> 여기서 잠깐!PHP Object Injection이란 무엇인가? 혹시 모른다면 아래 출제자 블로그에서 개념을 파악한 뒤 다시 여기 Demon 팀 블로그로 와서 풀이를 확인하자!
vaccine.php를 찾기 위해 Object Injection 양식 기준에 맞춰서 입력한 결과 이전과 같은 data input success 문자열만 출력되고 있다. 위 O:8:~ 는 입력 폼이다. 제공한 소스 코드를 참고하여 작성한 Object Injection data 내용이다.
vaccine.php 는 확인할 수 없었기 때문에 secretdata.php를 시도하면 [그림 14]와 같이 정상적으로 코드가 출력되는 것을 볼 수 있다.
[그림 15] - login.php
O:8:"medicine":1:{s:5:"input";s:9:"login.php";}
login.php (stage1) first_flag를 찾았던 로그인 페이지를 확인하면 마찬가지로 [그림 15]를 보면 [그림 14]와 동일하게 코드가 정상적으로 출력된다. 여기까지 확인하면 위에서 말한 검정색 가린 부분이 어떤 함수인지 추측할 수 있다는 것이다.
물론 추측이기에 정확하게 알아내려면 dataprocessing.php를 Object Injection 입력 폼에 맞춰서 입력하여 확인하면 된다.
추측이 가능한 부분은 vaccine.php를 검색하였을 때 정상적으로 되지 않았기 때문에 vaccine 해당 문자열을 감지하여 무언가 다른 역할을 하도록 만들었다고 생각할 수 있다. 하나 떠오르는 것은 치환이다. 다른 문자열로 입력되도록 만들면 data input success만 출력되도록 할 수 있다.
dataprocessing.php를 확인하면 예상대로 치환을 해주고 있고, 이용한 함수는 str_replace이다. vaccine을 확인하면 ""으로 변환시켜서 입력된다.
그러면 어떻게 입력하면 될까? str_replace 취약점을 이용하면 된다.
vaccine이 사라지고도 vaccine이 맞춰지면 되기 때문에 vacvaccinecine 이렇게 입력하고 object injection 폼 기준은 그대로 사라지고 남을 string length로 맞춰준다. 즉, vaccine.php의 길이는 11이다. vacvaccinecine는 14인데 replace되기 때문에 그대로 11로 넣어야 한다.
Mobile Pentest
시나리오: COVID 치료제 정보에 접근할 수 있는 암호 값이 내장된 애플리케이션을 받았다.
하지만 바이러스가 애플리케이션까지 감염되어 암호 값을 확인할 수 없게 되었다. 암호 값을 확인하자!

Scenario: An application including password values to access information for COVID treantment was received.
However, the password values cannot be verified due to the virus that has infected the application.
Let's find the password values!
[그림 1] mobilepentest.apk
시나리오와 함께 문제 파일이 주어지는데 받아서 녹스(Nox)로 실행하면 [그림 1]과 같이 mobilepentest.apk 파일이 설치된다.
시나리오 내용에서 먼저 얻을 수 있는 정보로는 암호 값이 내장된 앱이며 해당 암호 값을 확인해야 한다는 것이다.
그러면 직접 apk 실행을 통해 추가적인 정보를 수집하자
정보 수집
[그림 2] 실행 화면
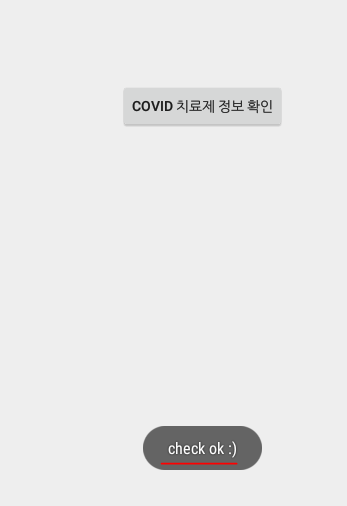
앱을 실행하면 "COVID 치료제 정보 확인"이라는 버튼 하나가 있는 것을 볼 수 있다.
[그림 3] medicine?
버튼을 누르면 메시지 박스창이 나오는데 제목은 코로나 치료제를 알고 있는지와 해당 치료제는 어디 있는지 묻는 내용이 포함되어 있다.
[그림 4] 체크 버튼 후
CHECK 버튼을 누르면 "check ok :)"라는 Toast.makeText 메시지가 출력된다.
"COVID 치료제 정보 확인" 버튼을 눌렀을 때 다른 반응이 나오게 하거나 앱 자체 내에 flag 값이 숨어 있을 것으로 보인다. 이유는 시나리오에서 언급한 것과 앱 실행 화면에서는 다른 단서를 찾을 수 없기 때문에 apk 파일을 직접 뜯어야 한다.
코드 분석
jadx-gui 도구를 이용하여 apk 내부 소스코드를 확인할 수 있다. 또는 웹에서 제공하는 디컴파일을 이용하는 방법도 있다.
medicine이라는 메서드가 정의되어 있는데 내용을 요약하자면 raw에 존재하는 flag를 가져와서 flag0 변수에 담은 뒤 다시 str 변수를 거쳐서 cryptotext 변수에 대입된다.
이후 flag 변수와 cryptotext 변수가 서로 치환 조건을 거쳐서 각 flag 변수에 들어가게 되고 최종적으로 flag는 flag1,2,3,4,5 변수 값을 합친 값이 된다.
여기서 중요한 점은 input1,2,3,4 변수에 각 비교하는 값이 맞는 경우와 틀린 경우 치환하는 값이 다르다는 것이다.
[3번 영역]
// 3번 영역====================================================

    public void onCreate(Bundle bundle) {
        super.onCreate(bundle);
        setContentView((int) R.layout.activity_main);
        ((Button) findViewById(R.id.button1)).setOnClickListener(new View.OnClickListener() {
            public void onClick(View view) {
                AlertDialog.Builder builder = new AlertDialog.Builder(MainActivity.this);
                builder.setTitle(MainActivity.this.title1);
                builder.setMessage(MainActivity.this.flag);
                builder.setPositiveButton("check", new DialogInterface.OnClickListener() {
                    public void onClick(DialogInterface dialogInterface, int i) {
                        Toast.makeText(MainActivity.this, "check ok :)", 0).show();
                    }
                });
                builder.show();
            }
        });
    }
}

// 3번 영역====================================================
onCreate 메서드, 앱이 실행될 때 먼저 실행되는 부분이다. Android에서 main 영역으로 볼 수 있다.
내용을 보면 버튼을 눌렀을 때 Toast.makeText로 "check ok :)"가 출력 되도록 작성되어 있다.
해당 문자열은 [그림 4]에서 본 check ok :) 문자열인 것을 확인할 수 있다.
여기까지 봤을 때 풀이 방법은 3가지 정도로 볼 수 있다.
1. frida 풀이
2. flag 요청 값을 확인 후 치환 코드 적용
3. flag 요청 값을 확인 후 수동으로 확인
우선 문제 제작 의도는 frida를 사용할 줄 아는지 확인하기 위해서다. 그래서 해당 풀이에서는 1번 방법으로 진행한다.
2번과 3번 방법이 거의 비슷하기 때문에 간단하게 2, 3번에 대해 요약해서 설명한다.
flag 요청 값을 확인한다는 것이 무슨 말일까? flag는 [2번 영역] 코드 초반에 R.raw.flag로 flag를 불러오고 있다.
앱을 개발 해본 경험이 있으면 2, 3번 방법으로도 풀이가 가능하다. raw라는 폴더에 flag 관련 파일이 포함되어 있다는 것이므로 디컴파일에서 리소스를 거쳐서 raw 폴더를 찾아 flag 관련 파일에 무슨 내용인지 확인하면 된다.
그 내용을 불러와서 치환하고 있기 때문에 안에 내용이 무엇인지 알게 된다면 직접 치환 코드에 적용하거나 수동으로 확인하는 것도 가능하다.
그럼 어떻게 frida 풀이라는 것을 확인할 수 있을까?
시나리오 내용을 다시 보자. COVID 치료제 정보에 접근할 수 있는 암호 값이 내장된 애플리케이션이 감염되어 암호 값을 확인할 수 없다고 했다. [3번 영역] 코드를 보면 medicine 메서드를 따로 요청하여 이용하는 것을 볼 수 없다. 보통 메서드나 함수를 정의하면 해당 메서드나 함수를 사용한다는 부분이 메인에 포함되어야 한다. 즉, medicine 메서드는 정의만 되어 있을 뿐 사용되지 않는다.
버튼을 클릭할 때 where is medicine이라는 문자열이 계속 출력되었는데 [1번 영역]코드에서 flag(전역 변수)로 지정을 했기 때문이다. medicine 메서드를 실행하면 해당 flag 변수 값이 변동되어 출력된다.
그러므로 frida를 통해 medicine 메서드가 실행될 수 있도록 스크립트 코드를 작성하여 로드하면 된다.
[2번 영역] 코드를 보면 input1,2,3,4 변수에 각 비교하는 값이 맞는 경우로 맞춰야 하기 때문에 해당 변수 값 중 틀리게 설정되어 있는 값을 변경해야 한다.
전역 변수에서 input1,2,3,4 전부 2를 대입하고 있다.
비교하고 있는 값을 보면 input1 == 2 // input2 == 0 // input3 == 2 // input4 == 0 이다.
frida를 이용하여 작성한 스크립트를 로드하고 조금 기다리면 flag find it! 문자열이 출력된다. 그리고 "COVID 치료제 정보 확인" 버튼을 클릭하면 [그림 5]와 같이 Do you know COVID medicine? 제목이 medicine 메서드 실행으로 인하여 COVID medicine data로 변경되었고, where is medicine? 문자열 또한 flag 값으로 변경된 상태로 출력된다.
문제 페이지에는 연구소 인트라넷 페이지가 구성되어 있다.
이 연구소 인트라넷 페이지에 제공되는 사내 클라우드에는 백신 제작에 중요한 단서가 되는 파일이 있는데,
해당 파일을 열람하기 위해서는 일반 직원의 권한이 아닌,
연구 직원의 권한이 있어야만 파일을 열람할 수 있도록 보안이 되어있다.
문제에서 요구하는 권한을 얻어서 파일을 열람할 수 있습니까?

The Challenge is laboratory Intranet Website
The lab is providing cloud services, Cloud services have important clues to produce the COVID-19 vaccine
You need the authority of the lab staff to access the file.
Can you obtain the authority required in the matter?
문제 페이지에 접속하면 다음과 같은 화면이 표시됩니다.
회원가입 후 로그인을 거쳐 메인 페이지로 접속하신 뒤 게시판(/board)로 접근하시면 다음과 같습니다.
해당 페이지 내 게시글을 읽게 되면 URL 요청으로 /read?idx=게시글ID 형식으로 요청을 하고,
아래와 같은 글 읽기 섹션이 표시됩니다.
여기서 발생하는 취약점은 Union Based SQL Injection 으로, /read?idx=게시글ID 형식으로 요청을 할 때
게시글ID 값에 Injection Query를 발생시키면 다른 데이터베이스, 테이블, 컬럼 및 행 조회가 가능합니다.
마지막으로, 위와 같이 쿼리를 조합 해주면 user테이블의 username과 auth_token 값을 알 수 있습니다.
765f615f635f635f695f6e5f65 이 값을 hex 디코딩 과정을 거치게 되면 v_a_c_c_i_n_e 이라는 값을
얻을 수 있습니다. 이제 해당 값을 통해 mypage 내 credential을 통해 계정에 관리자 인증을 합니다.
그럼 이전과 다르게, 내 정보의 credential 값이 admin 으로 변경됩니다. 이제 페이지 내 클라우드(/cloud)로
접속합니다.
클라우드 섹션에 접근하면 위 사진과 같이 aws bucket를 제공하는데, 이 bucket의 내부 저장소에 접근하여
특정 문서 파일을 다운로드 할 수 있습니다.
이제 다운로드 된 파일을 열어서 플래그를 찾아 획득합니다.
os 포맷을 해서 docx가 없는 관계상 ㅎㅎ.. 이렇게도 확인 가능합니다.
[MISC] Infected File
최근 코로나19에 따른 보안 위협의 이슈가 되고 있는데 연구소 직원이 메일 서비스를 이용하던 중, 피싱 메일의 첨부파일을 실행하여 악성 코드에 감염되었다.
해당 직원의 컴퓨터에는 코로나19 바이러스에 대한 중요한 연구 단서가 있었는데, 해당 파일이 암호화되면서 파일의 내용을 확인할 수 없게 되었는데..

암호화 되어버린 파일을 복구하여 파일의 내용을 읽을 수 있을까?

Nowadays, the world rising a issue what the cyber security threat by COVID-19.
One of the laboratory worker was using mail service.
She clicked on a phishing email that attached malicious code.
Her computer has been important evidence of research about COVID-19.
Unfortunately.. this file also encrypted then We can not open it.

Could you recover that encrypted file for us ?
우선 문제에서 제공된 파일을 다운로드 하면 암호화에 사용된 py파일과 암호화 처리 된 파일이 제공됩니다.
enc.py를 열어보면 다음과 같이 키 값에서 힌트(?) 를 얻을 수 있습니다.
그렇습니다. 키 값은 문제 풀이에 약간의 혼란을 주기 위해 origin key를 base64 인코딩 처리한 키 값입니다.
따라서 해당 키 값을 base64-decode 과정을 거쳐 주면 origin key를 얻을 수 있습니다.